
Contents
Introduction
Bakonawa Extermination is a weekly three-phased instance, set in Bakonawa Lake/Lair east of Port Malaya, about the legendary Bakonawa, a sea-serpent-like monster said to be the devourer of the moon. The instance refreshes every 7 days and has a 2-hour time limit.

Requirements
- Player must at least be base level 140
- As with every instance, player needs to be in a party. If you are going solo, you need to be the party leader.
- Player must have completed the following prerequisite quests:
- Cautious Village Quest (start at /navi malaya 266/76 and follow the arrows)
- Bakonawa’s Main Quest (after doing Cautious Village Quest, start at /navi malaya 283/265)
- Player must not have completed Bakonawa Extermination with the same character in the last 7 days.
- Player must not be overweight to enter the instance.
Equipment to prepare
- As Bakonawa casts Meteor Storm, it will be helpful to stack Fire resist gear/items
- See: Fire Armor Scroll, Fire Resist Potion, Lucius’s Fierce Armor of Volcano

- As Bakonawa casts Storm Gust, it will be very helpful to be immune to being frozen
- See: Marc card
- Note: if you have access to Magnetic Earth or if you are stacked with very high magic defense, (1) and (2) will not be necessary.
- As Bakonawa is a water monster, use the wind element for damage. For physical classes, endow your weapon with wind, use wind element ammunition, or use wind-element weapons. Ranged skills and gear is recommended. Bakonawa in unreachable by certain melee skills and auto-attacks. For magic classes, use wind-element spells.
- See: Wind Converter Scroll, Chain Lightning Skill
- While not necessary, you can prepare Attack Speed (ASPD) increase items or skills for the gongs portion.
- See: Enriched Celermine Juice
- Healing Items and Token of Siegfried (in case of death)
Bakonawa MVP Stats

Basic Information
| Lvl. 154 | Dragon | Large | Water 4 |
Primary Stats
| 251 STR | 134 AGI | 194 VIT |
| 70 INT | 237 DEX | 66 LUK |
Secondary Stats
| 3,351,884 Health | 472 Def | 0 MDef |
| 10 Range | 4,247 – 6,168 Attack | 1,976 – 3,477 MATK |
| 0.50 Speed (cells/sec) | 490 Req. Hit | 563 Req. Flee |
Elemental Weaknesses
| Neutral | 100% |
| Water | -50% |
| Earth | 100% |
| Fire | 60% |
| Wind | 200% |
| Poison | 25% |
| Holy | 75% |
| Dark | 75% |
| Ghost | 25% |
| Undead | 25% |
Monster Skills
| NAME | STATE | CHANCE | CAST TIME | CONDITION |
|---|---|---|---|---|
| Idling | 100% | instant | If the monster’s health drops below 30%. | |
| Attacking | 100% | instant | If the monster’s health drops below 30%. | |
| Chasing | 100% | instant | If the monster’s health drops below 30%. | |
| Chasing | 100% | instant | ||
| Attacking | 20% | 1 sec | If the monster’s health drops below 80%. | |
| Attacking | 5% | 0.5 sec | ||
| Attacking | 5% | 0.8 sec | ||
| Attacking | 5% | 0.8 sec | ||
| Attacking | 100% | instant | If the monster’s health drops below 30%. | |
| Attacking | 20% | instant | ||
| Attacking | 5% | instant | ||
| Attacking | 100% | instant | ||
| Attacking | 5% | 0.5 sec | ||
| Attacking | 20% | 0.5 sec | ||
| Chasing | 20% | 0.5 sec | ||
| Attacking | 20% | 0.5 sec | ||
| Chasing | 20% | 0.5 sec | ||
| Chasing | 50% | 0.5 sec | ||
| Attacking | 5% | 0.5 sec | ||
| Attacking | 5% | 0.7 sec | ||
| Attacking | 20% | 0.8 sec | ||
| Attacking | 5% | 0.8 sec | ||
| Attacking | 100% | instant | If the monster’s health drops below 30%. | |
| Attacking | 20% | 1 sec | ||
| Attacking | 20% | instant | ||
| Attacking | 5% | instant |
Starting the Instance
- Go to Port Malaya.
- You can go to Port Malaya by paying the Optamara Crew NPC (alberta 237, 71) in Alberta 10,000 zeny.
- You can also use up an Inside-out Shirt to warp directly to Port Malaya
- Tip: You should have 5 inside-out shirts as a reward from completing the Bakonawa Main Quest. If you do not, this should be a sign that you may have overlooked completing such prerequisite quest.
- From Port Malaya, get to the north-east warp.

- From that map, teleport to the south-east warp.

- Once inside, navigate to /navi ma_scene01 174/179.

- Speak to Taho.

- Choose “Please weave a rope” to Bakonawa Lake
- Wait for a bit until the standby period (common to all instances in general) finishes.
- Talk to Taho again.
- Choose “Now I will go down.”
Instance Proper
The instance has three phases.
Phase 1
- Buff up before speaking with Taho.
- Speak with Taho to trigger Phase 1.

- Choose “Let’s do it!”
- Follow the pathway a bit east and then north to the lake. You will see Bakonawa in the middle of the lake.
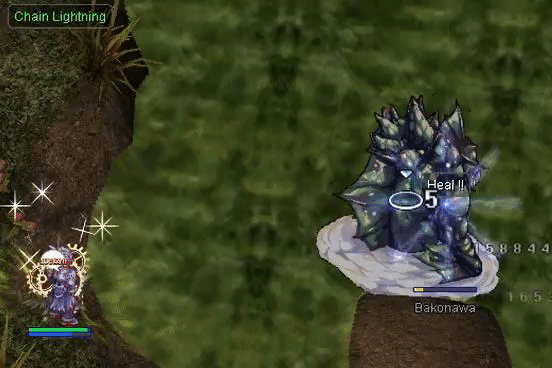
- Attempt to snipe/damage Bakonawa from the west, at max distance. Remember to make use of the wind element.
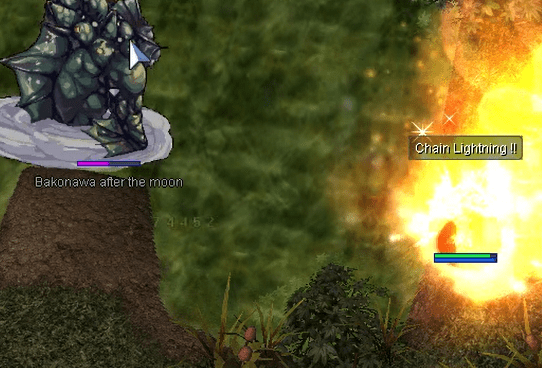
- If you get too close, Bakonawa will spam Meteor Storm on your location. Make sure to wear your fire armor or use fire resist consumables.
- Keep damaging Bakonawa until he hides under water and you see the moon animation. Lore-wise, he is trying to swallow the moon here.
- Note that there is a 10-minute cooldown for this Phase.
Phase 2
- Walk west (from the middle of the lake) or north (if you are already in the west from sniping in Phase 1), until you see gongs and a cauldron.

- Note: you are still continually being spammed with Meteor Storm at this Phase. Spam your healing potions and keep your fire resist consumables and/or armor up.
- Pop your ASPD potions, wear your ASPD-increase gear, or simply remove your weapon for more ASPD. We are stacking ASPD because the gongs and cauldron are plant-type. They take only 1 damage per hit. You can try burn status-inducing gears/skills too. Burn bypasses the 1 damage-cap.

- Hit the gongs until they are not clickable anymore. Lore-wise, you are trying to make noise here to resummon Bakonawa again.
- Do the same with the cauldron below the gongs.
- Walk to the other side (east of the lake). You have to repeat the process for the gongs and cauldron there.

- Note that there is a 5-minute cooldown for this phase. As such, your attack speed must meet a certain threshold to pass this phase.
Phase 3
- Bakonawa reappears in the middle of the lake, now enraged.
- Similar to Phase 1, try to snipe him at max distance. You can do this from either side of the lake. If done well, Bakonawa will not cast other skills apart from Meteor Storm. If you stand too close, however, he will cast Storm Gust, Lord of Vermillion, Break Weapon, and several other possible skills as listed above. Be prepared with your Unfrozen armor.
- If you take too long in killing him, he will summon minions, which are stronger version of Port Malaya mobs, about 15 every 2 minutes. Kill them as soon as you can.
- Keep damaging Bakonawa until he dies.
- A Bakonawa Treasure Chest should appear in front of the lake after his death.

- Do not butterfly wing out. Walk back to Taho and talk to him. You will get 5x Ancient Grudges and be teleported out of the instance.
Rewards
Possible loot from Bakonawa’s Treasure Box:
| NAME | TYPE | DROP CHANCE |
|---|---|---|
| Etc. | 20% | |
| Etc. | 20% | |
| Etc. | 20% | |
| Armor | 10% | |
| Shield | 1% | |
| Etc. | 0.01% | |
| Etc. | 100% | |
| Card | 0.01% |
Was this helpful?
4 / 0