Contents
Introduction
The Guillotine Cross, often called GX by players, is known for its flexibility and wide range of builds. One popular path uses the assassin-only weapon, the katar, to access Rolling Cutter (RC) — a spinning attack that deals 300% damage at max level within a 5×5 area of effect (AoE). This build offers strong mob control and is a great starting point for new GX players.
Rolling Cutter (RC) was once used mainly for leveling, as it didn’t have enough power to defeat tougher bosses. Over time, with the addition of new equipment from gacha eggs and episode updates, RC has become a strong and reliable primary skill — now capable of taking down even high-tier MVPs.
Skill Build
1st Job
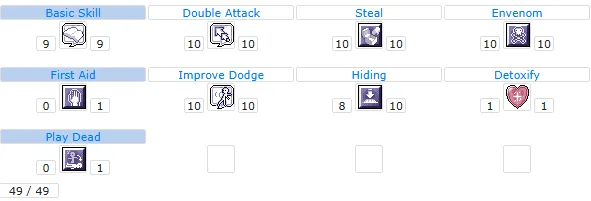
2nd Job
Note: Choosing Grimtooth over Meteor Assault can be a viable option, especially for players who don’t have access to 0.3s Fixed Cast Time reduction equipment, which is required to remove the Fixed Cast Time (FCT) of Meteor Assault.
3rd Job
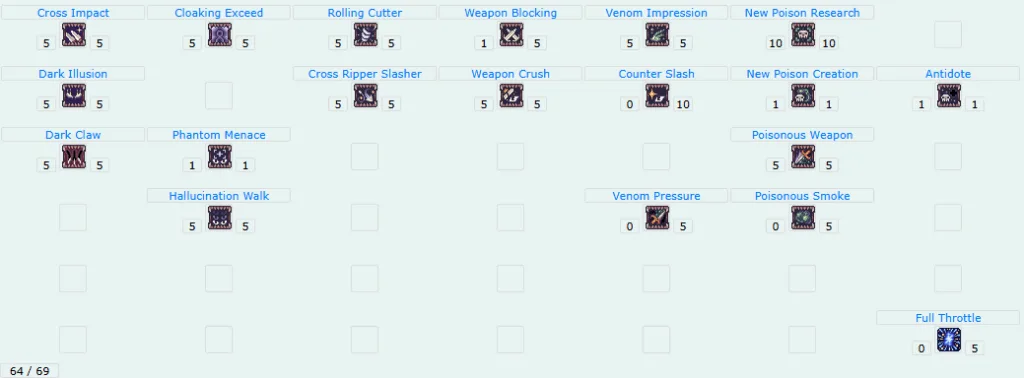
Note: The current maximum skill level is 65, allowing for 64 points to be distributed. While most points should go toward essential skills, some — like Weapon Blocking and Weapon Crush — are also worth considering as they trigger important item bonuses.
Equipment
At first glance, Rolling Cutter (RC) may seem to only require attack speed (ASPD), hit rate, and damage to be effective. However, one often-overlooked stat that significantly enhances the skill’s performance is After Skill Delay (ACD) reduction. ACD reduction allows players to maximize their ASPD, increasing the number of RC hits up to a maximum of 7 hits per second. Having around 35% ACD reduction is a solid starting point for RC spam, but higher ACD reduction enables smoother chaining of skills between Dark Illusion, Dark Claw, Rolling Cutter, and Cross Ripper Slasher.
Upper
| Absolute best-in-slot! Even without rocking the full combo, the damage boost from this item is just out of this world! | |
| Boosts Cross-Ripper Slasher damage, Cross Impact Damage, ASPD, Critical Damage. | |
| Best sustain headgear. Great source of HP and SP steal. Works best with | |
| High damage headgear. Works best with | |
| Decent Damage headgear. Works best with | |
| High ATK proc-based headgear. | |
| Great source of Long Ranged Damage boost, ACD reduction and Perfect Hit. | |
| Grants a flat amount of HP and SP with every monster you take down! Awesome for early sustain, but starts to fall behind when you’re up against tougher mobs. | |
| Decent sustain headgear. Proc rate and amount of HP/SP absorbed is not influenced by refine rate. | |
| A free sustain headgear straight out of the New User Box! It’s the weakest among the HP/SP steal options — but hey, it’s free and gets the job done early on! |
Middle
| The best sustain midgear with built-in ACD reduction. It requires 120 STR to fully maximize its bonuses to ATK, Ranged Damage, and Elemental Damage. | |
| An all-around midgear that provides a balanced mix of ATK, ASPD, Critical Rate, HP, ACD reduction, Hit Rate, and other bonuses, all scaling based on your stat distribution. | |
| Provides high ATK and Critical Damage but requires 125 LUK to maximize its potential. It can be a strong option when paired with other LUK-dependent gears such as | |
| Provides a huge boost to ATK but requires 120 INT to equip. It can be a great option if you can find the right balance in your stat distribution. This setup works best when paired with | |
| Provides ASPD. Works well when worn with | |
| Provides Perfect Hit along with a modest boost to boss damage. | |
| Does not offer any remarkable bonuses aside from having a card slot, but works best when paired with | |
| Provides a small amount of ATK but can be enchanted with melee damage boost. Works best with | |
| Provides a small amount of ATK and ACD reduction by default. Works best when paired with | |
| Provides a small boost to HIT, Perfect Hit, and ACD reduction. Works best when paired with | |
| Provides +1 ASPD, making it a great choice for beginner setups. |
Lower
| Allows the user to auto-cast Aspersio when physically attacking, without requiring Holy Water for activation. | |
| Does not provide any significant bonus but must be worn with | |
| Provides ridiculous damage bonus when worn with: | |
| Boosts physical damage against all enemy sizes. The damage increase scales with every 50 combined base STR and INT points. | |
| | Works best when paired with |
| Boosts physical damage against all enemy sizes and provides Perfect Hit. The damage increase and Perfect Hit bonus scale with every 50 combined base STR and LUK points. | |
| Provides ASPD when worn alone but when worn with | |
| Provides ACD reduction and reduces SP consumption. | |
| When worn alone, it provides no bonuses. It only becomes effective when equipped with | |
| Provides a bonus to melee damage. | |
| Provides EXP and drop rate bonus. | |
| Provides HP absorption and works effectively even without a combo. |
Weapon
| An absolute best-in-slot beast! This item pumps up your ATK, ASPD, and ACD reduction, while cranking up the damage for Rolling Cutter, Cross Ripper Slasher, and both ranged and melee attacks! On top of that, it can be enchanted with insane effects to push your power even further! At +11, it works well with | |
| The basic form of | |
| When paired with | |
| Gives you a slick boost to ASPD, Cross Ripper Slasher damage, and ramps up your damage against small and medium enemies! Best paired with a | |
| Comes in various elements, ranging from neutral to darkness property, making it useful against targets and dungeons with specific elemental weaknesses. As a level 3 weapon, it’s easy to refine, so don’t be surprised if you encounter people selling or trading +15 Crimson Weapons. Additionally, it can be worn by Assassins as early as level 70. | |
| Best teamed up with a | |
| Can be obtained from the |
Armor
| The base stats alone provide a great amount of ATK. When enhanced with the right modules, the ATK nearly doubles, and it also provides a significant amount of ACD reduction. Honestly, I’m almost tempted to call it best-in-slot. What’s even better? This armor is virtually free, as the materials needed to craft it are already provided by the Episode 17.1 quest line. | |
| Provides ATK and damage penetration against Beast and Demon monsters. Aside from being enchantable with ACD reduction, this armor can also serve as an elemental armor, as there is a chance it will change its element upon enchantment. Works best in a set with | |
| Provides HP and SP absorption but offers no other bonuses. Never wear it together with | |
| Provides armor penetration against Undead, Demon, and Demi-Human enemies, scaling with refinement level. Can be enchanted twice to further boost damage. Best paired with | |
| Provides resistance against Fire and Shadow damage, scaling with refinement level. Can be enchanted twice to further boost damage. Best paired with | |
| Not exactly a GX gear, but it packs a punch with a hefty boost to Perfect Hit! It’s the perfect addition to your gear setup if you want to lock those hits in against high flee-MVPs! | |
| Provides a significant amount of ACD reduction when paired with It also grants a considerable HP bonus that scales with refinement. However, it lacks a card slot, which limits customization. | |
| When the race and element align, these dresses can dish out insane damage! No card slot? No problem! Each one has its own element, providing protection against the perfect targets! |
Garment
| Provides massive boosts to ATK, Melee and Ranged Damage, and Elemental Damage, on top of the Perfect Hit it grants. Pair it with | |
| Best worn with | |
| Provides ATK, APSD, Size Damage, Melee Damage and a sprinkle of neutral damage reduction. Works best with | |
| Provides a big boost to HP% and a ton of HIT! Pair it up with a | |
| Provides ATK when worn with | |
| Provides a great amount of flee and Perfect Dodge. Works best when paired with | |
| An all-around garment that provides, ATK, ASPD, Ranged Damage, Neutral resistance, and Critical Damage. It can be maximized by allotting 90 points to specific stats. The best part of about this item is that it allows you to use the skill |
Boots
| This is THE go-to gear for Rolling Cutter damage, class damage, and massive HP/SP boosts, all while packing a hefty dose of ACD reduction! It’s the best-in-slot option right now—just make sure you unlock the necessary skills to fully unleash its insane bonuses. | |
| At 120 STR, it provides a decent amount of ATK along with a refine-scaling ATK bonus. Activates multiple bonuses when paired with: With a specific 4th enchant, you can pair it with a | |
| Provides ATK, ASPD, and HP that scales with refine. Pair it with or | |
| A non-tradable footwear that provides impressive elemental damage boosts. An underrated feature of these boots is that they grant access to | |
| Provides a decent amount of SP and can be enchanted with |
Accessories
| Provides ridiculous amount of stats and bonuses depending on your stat distribution. Best worn with LUK-dependent items to unleash the higher level of armor penetration. | |
| Provides an ATK bonus that scales with the user’s LUK. At 125 LUK, it unlocks even more ATK bonuses and additional Boss Damage. | |
| Best worn with a | |
| One of the more influential accessories in terms of skill build as it requires specific skills to unlock its full potential. A great source of stats, ACD reduction, ATK, ASPD, and cooldown reduction for | |
| Best worn with a | |
| A decent source of ATK%, ASPD, ACD reduction, Melee Damage, and some armor penetration. | |
| Provides raw stats and reductions. Best worn with | |
| Individually, it provides solid stats — but it truly shines when paired with a Wearing them as a set unlocks extra ATK, Melee ATK, and even more damage that scales with refinement level! | |
| Decent source of ASPD and some damage boost. | |
| A straight-up upgrade from the | |
| A better version of | |
| When paired with | |
| Dropped by Illusion Dracula. When paired with | |
| A farmable accessory through Geffen Magic Tournament (Daily Solo Instance). Among all the available enchants, ASPD/ASPD is the top pick for the Rolling Cutter Build. | |
| Can be enchanted with |
Costume Stones
| Provides SP absorption when worn with Guillotine Cross Stone(Garment) | |
| Provides more Cross-Ripper damage when worn with Guillotine Cross Stone(Garment) | |
| Provides more Rolling Cutter damage when worn with Guillotine Cross Stone(Garment). | |
| Provides Rolling Cutter Damage |
Shadows
The enchantments for the shadows depend entirely on your final build. Generally, ASPD +1 or ASPD% are popular choices to maintain stable performance without constantly relying on consumables. However, if you plan to fully stack all available consumables and buffs, feel free to enchant everything with raw ATK for maximum damage.
| Unlock more Rolling Cutter damage with the Rolling Shadow set, which scales with refinement level! Pair the Rolling Shadow Shield with the Guillotine Cross Shadow Weapon to unlock even more armor penetration! | |
| Only wear these accessories if both of them are +10 to get the most out of set. The set provides elemental damage boost, melee/range damage boost, on top of knockback immunity and HP bonus. Works well with Rolling Shadow Set. | |
| If you choose to skip the Rolling Shadow Set, these shadows can offset — or even exceed — its damage output, depending on your setup. Only wear these shadows if both are +10 to maximize the set’s potential. The set grants an elemental damage boost, melee/range damage boost, knockback immunity, and an HP bonus! | |
| Only wear this set if the total of its parts is +18 or higher. Consider equipping it if your current gear doesn’t provide armor penetration. | |
| Only wear this set if the total of its parts is +18 or higher. Consider equipping it if your current gear doesn’t provide armor penetration. But don’t wear it if you’re going for the full Rolling Shadow Set — the armor penetration is capped at 100%. | |
| Great source of raw stats that scale with refinement level. However, in terms of damage output, it falls short compared to the Maximum Mammoth Shadow Set. | |
| If you choose to skip the Rolling Shadow Set, consider using this shadow as it provides great amount of damage, ASPD, and ACD reduction. | |
| If your setup already provides armor penetration, consider using this shadow instead — it offers additional ASPD, damage, and even more offensive boosts. | |
| If your setup already provides armor penetration, consider using this shadow instead — it provides size damage and size penalty negation, making it especially effective against large-sized monsters. | |
| If you decide to use the full Rolling Shadow set but don’t have access to Maximum Mammoth Shadows and Almighty Shadows, consider using this set instead — it provides size damage and size penalty negation, making it especially effective against large-sized monsters. |
Cards
Sample Build
The equipment and cards were discussed first because the overall performance and stat priorities of the Rolling Cutter build are heavily influenced by the specific gear setup you choose to use. Depending on your equipment, your stat distribution and playstyle may change significantly.
In this section, I will give you an example of a gear composition then follow it up with a suitable stat build that aligns with the setup.
| Equipment | Card | |
| Upper | ||
| Mid | ||
| Lower | ||
| Armor | ||
| Garment | ||
| Shoes | ||
| Weapon | ||
| Accessory(R) | ||
| Accessory(L) |
Stats
| STR – 120 | Item/s that require/s STR: |
| AGI – 97 | AGI affects the damage of Cross Ripper Slasher, ASPD, and flee rate. With the current setup, it is important to always reach 193 ASPD since the ACD reduction is enough to improve the overall DPS of Rolling Cutter. |
| VIT – 90 | Same case with LUK, the closer we are at 100 VIT, the better to get the desired resistance. |
| INT – 80 | Item/s that require/s INT LoR provides 4% magical and physical damage against all sizes for every combined 50 points of STR and INT. In this setup, LoR will provide a total of 16% magical and physical damage against all sizes. |
| DEX – 84 | Item/s that require/s DEX This means that the combo will provide 17% more Rolling Cutter damage. I decided not to over-invest in DEX since the closest bonus will be at 96 DEX which will affect my overall setup in exchange of a 1% damage boost. |
| LUK – 90 |
RC Gameplay Vids
Was this helpful?
6 / 0